How To Order & Print Foil Heat Transfers
Browse Video Categories
Transfer Application | Artwork & Apparel | Easy View Tutorials | Webinars | Ordering Tips | Business | Heat Presses
Hey Friends! Dave here with Transfer Express, and today we’re getting fancy with foils!
That’s right, we’re covering everything heat transfer foil, from best practices with your artwork, how to order and then all the way through to the simple, two step application. Best part of all, there’s no need to cut or weed with the screen printed transfers from Transfer Express, making these the best option for your larger quantity orders- but, with quantities for screen printing as low as 6, they may be the simple, shiny solution for your shirts in any order size.
Ready? Let’s roll!
Heat transfer foil doesn’t have to be confusing or intimidating, and even though it's a two step process, it doesn’t need to be complicated. It’s just as easy to use as any other heat transfer.
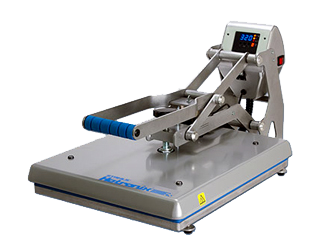
Now before we get too in-depth, our supply list for today is going to be limited to just a heat press. I’ve got the Hotronix 16 x 20 Auto Clam here behind me already heating up and ready to go. So let’s jump over to TransferExpress.com to get started.
We mentioned applying heat transfer foil is a two step process, and ordering is also a two step process- the foil itself, and the adhesive the foil will be adhering to.
So first up, let’s go get the foil. We’ll click here on products in our main navigation and then heat transfers. Next, since these are screen printed transfers, we’ll click on screen printed. Here you can see all of our awesome plastisol ink transfers and tucked in right here are the heat transfer foils. This is where we can select from the 12 different colors we stock here at Transfer Express. They all come as 10 packs of foil sheets, in a convenient 12 x 15” size- perfectly matched to the 11.25 x 14” sheet size for the actual screen printed transfers. Once we select the color and quantity we want here, we can add these to the cart and swing over to Easy View online designer, by clicking the Order Transfers here at the top.
Now in Easy View online designer, this is where we’re going to order our screen printed transfers for our foil adhesive. You can upload your own designs right here using the “upload your art” button, or design online using the huge catalog of customizable layouts and clipart. For our example today we’re going to whip up a quick layout using the artwork here in the designer.
Before we start designing, we’ll start by changing our product type in the bottom left. We’ll select screen print as our print method, and foil adhesive as our product type.
Now, let’s get to the design. Let’s open the layouts tab, and just search Local in the search bar at the top. This layout here, QPR-34 looks awesome, and what we’ll use here today.
Once you click, it’s added to your artboard. Now, this artwork pulls in with some distressing, but we can easily just click “clear” next to the distress effect controls here in the edit menu. With any of the customizable layouts, you can easily just double click on the text to change it. Here, instead of Drink, we’ll change the text to “Explore” and Michigan over to Arizona.
Just as easy as changing the text, we can change the state shape here, too. Let’s select the state shape by itself, and check the edit menu here on the left side where it says replace clipart. With just a click we can replace it with more clipart. Let’s search Arizona in the search bar and grab our new silhouette state shape. Let’s add some fun texture to this state by selecting pattern fill with our new clipart selected. Aztec-2 looks to be exactly what we’re looking for.
Once our pattern is set, we can adjust all of these colors over to the Foil adhesive inks- just by selecting each swatch here at the top of the edit menu.
To top this design off, let’s outline the entire state shape. We’ll go back down to the effects at the bottom of the edit menu and select outline. Here we’ll select touching outline and then adjust the thickness of our line to our liking. There we go, looks great!
Now ensuring all of our ink colors are set over to the foil adhesive and we resized our art and double checked our dimensions on the left side, we’re good to go.
Then we’ll set the quantity details here and you’ll see active pricing populate at the bottom right along with your turn time. Of course, we still have some room on this sheet where we can fit any additional artwork we need, to maximize our printing. Once we’re set, we’ll review the detail and artwork one more time, and add this to our cart.
Once our transfers arrive, we’ll get everything ready for printing. We’ve got our heat press all set at 340 degrees for 8 seconds at a medium to firm pressure for our first adhesive press. Today we’re using my absolute favorite heat press, the Hotronix Auto Clam 16 x 20. Its auto open feature is so convenient and you don't need a noisy air compressor at home or in your shop- just a dedicated 15 amp regular outlet. With its easy loading coupled with the Caddie Stand and that auto open feature, you can’t find a more reliable heat press for any size business.
Press adhesive first: 340 degrees, 8 seconds, medium to firm pressure with a hot peel.
Align the Foil sheet over the artwork, with the foil color facing up, for 340 degrees, 30 seconds, and a cold peel.
So while we have a two step process here for our foil heat transfers, it’s not any more complicated than pressing any type of transfer. I hope you feel confident to order your own foil transfers to add some fancy fashionable looks to your next project.
Of course, at Transfer Express, we are dedicated to helping you and your t-shirt business thrive! Be sure you’re subscribed to our Transfer Express YouTube channel to stay up to date with all the new helpful content we’re releasing every single week. Until next time, I’m Dave, happy pressing!

